Saturday, October 24, 2015

Mixed Media Weaving

This mixed media weaving was a great way to use odds and ends. Scraps of yarn, old pieces of embossing metal, cut up strips of painted paper from projects past, and scrap pieces from basket weaving. We also have tons of donated fabric I wished I had thought of to use.

Even the pretty blue and gold paper was donated.  Since I had mostly younger students, I cut the paper into strips for them. 

I didn't cut all the way to the top. I've done paper weaving both ways and it is so much easier to weave when the top is kept together.

We used a strip of painters tape to anchor the weaving to the table, which is also another life saver, and will keep your students from being frustrated. 

The only problem with this project was gluing to the black background paper. The basket weaving strips wanted to curl.  So I buddied up kids that used these strips and they helped hold down while they were weaving.  

I had them add a bit more glue than normal, and then we placed tubs of markers on top for 20-30 minutes to make sure the art attached to the black background.  It also flattened out the basket weaving strips so they laid flat.

Wednesday, October 14, 2015

Holiday Art Work...Yes or No?

These are art pieces from my previous school that I just ran across.  I spotted these on another blog 4-5 years ago and wanted to do them with my kids at school.

Holiday art can be a bit tricky though and I didn't want any kids to feel left out if everyone was doing them. No one wants to be the one kid singled out, ever!

So after some contemplation I decided that after my several weeks of working on another art project, I would offer several centers for them to choose from. (Of course, only after the art lesson was completed  and all parts of the lesson was done as expected)  There are always the kids that rush and completely destroy their artwork so they can go to centers...ummm I don't think so.  

Anytime centers are allowed, I always make very clear that if they are skipping steps or rushing/scribbling to get done and get to centers, they will be very disappointed when they have to start the lesson completely over.

I also let them know that centers are a privelge that is rewarded by their hardwork. If hard work isn't being demonstrated, then it will be a long time before centers are offered again.

Both of these projects, plus another non holiday art piece, in addition to free drawing and manipulative stations were offered.  The centers were a success and no one stood out because of their religion or personal beliefs.  How do you handle holiday art?  

Friday, October 2, 2015

Wedding Bliss

I feel like I can breathe once again. We hosted a backyard wedding this September for my sweet sister-in-law. We were so honored to do so! No pressure, said no one ever hosting a wedding! I was reminded once again why weddings cost big bucks. 
But, our family did get some wonderful bonding time with all our DIY wedding projects.

Only a few tears were shed!

Our backyard is in great shape now, ready to host some smaller scale get togethers.

While for six weeks or so the inside of my house was neglected, I think I'm almost caught up. 

 
Now maybe I can start getting back into the groove of blogging once again! 

Thursday, September 24, 2015

Cityscape

This summer for art camp, I chose to do a city scape.  The kids all enjoyed putting together their skylines and dreaming up their buildings.  
To give these cityscapes a bit of dimension, we painted the water and sky with acrylic first on the canvas.  Then,  the kids went to work on a piece of watercolor paper to create the city.  After they were sharpied and then watercolored, they cut them out.  The kids then attached their city with glue.  
Once their city was in place, they added a blue moon, which we painted with acrylic on a seperate piece of paper, cut out and glued where it seemed to fit best into the city.  And of course, we added the reflection, which is done with oil pastels.

I love this leaning tower above, interesting angles!
 

This cityscape looks like something from the future!  He was one of my youngest campers, what a talented young man.  One day at camp, he told me that he comes straight home from school everyday and does artwork until it is time for dinner.  And then he goes to bed and dreams of making more art.  I've got a long time to wait, but I can't wait to see what he does as a career.

Wednesday, August 12, 2015

Cardboard Sculpture

This year at one of my camps, I incorporated a cardboard sculpture.  I have been seeing the super cute lesson with the Miro sculpture floating around on pinterest from Arteascuola.  Here is the link to that lesson; Three dimensional Miro.  This was done on our last day of the camp, so they only  had a couple of hours to work on these.  
To simplify, because of time, we used sharpie for color rather than paint.  It was such a fun, fast and furious project.  They did a great job putting these together.

It was a great challenge for all the kids.  Making the cuts to fit onto other pieces.  And then the biggest challenge was to balance the pieces to stay together.  They really came together to help one another.  
Even the placement of tape was crucial for the sculpture to stay together.  

I highly recommend this project.  While each student walked away with their own sculptures, it really had more of a collaborative element to the construction part.  

They were very proud of these sculptures, and I heard more than once that they wanted to do this at home as well.  

I really regret not getting more photos of all the action, but of course I was also very busy helping them and trying to get their weeks worth of fabulous artwork rounded up!  

This summer I have been brain storming on how to make changes to this project to be classroom friendly with 120 students and no storage space!  This is another beautiful thing about holding art camps.  You are able to try out new ideas on a small group and see how to adapt them for larger groups.  Plus, it is just fun to be with a group of 20 kids that LOVE ART!!

Wednesday, July 29, 2015

Cupcake Weavings

During summer camps, I like to add a variety of activities.  While most weavings seem daunting for a short 4 day camp, these small cardboard weavings are perfect!
Not only do they have the fun of weaving, but also designing the loom.  This year, I decided on a cupcake theme.  While I don't have many photos of the finished product, these few will give you an idea of the completed project.  

I simply love that this is a great introduction to weaving, and those who already know how, well this is a great refresher!  
Below are a few examples from last years weaving on fish looms.


Cereal boxes and other pressed cardboard make an excellent source for the looms.  Plus, it is a great way to reuse!  Saving the earth, one art project at a time...  Seriously, though, it is a great way to teach resourcefulness. And a great way to cut down on expenses.  


Batik Georgia O'Keefe Sea shells


I am actually playing a little bit of catch up. This summer was super busy and of course the beginning of school is always crazy, trying to get everyone's schedules lined out.  This project was inspired by Georgia O'Keefe with my second graders. It was completed last spring.

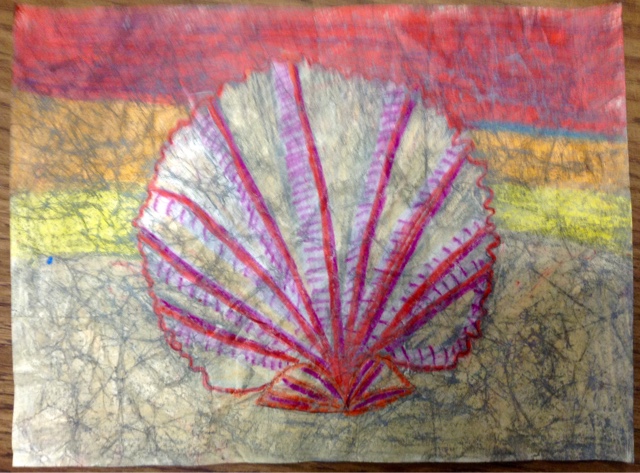
We decided to do seashells in the larger than life way O'Keefe would have painted them.  Although she does not have many shell paintings, there are a few. We spent several weeks just practicing and deciding on the shell.

Once the students decided on their shell, they drew them out on Manila paper. I find that Manila paper absorbs the paint just right without disintegrating the paper. I've used paper before where that happened. 
          After they have drawn out the shell, they were asked to use a peach, white and then they could pick a couple additional colors as accents.

Of course this becomes the hardest part of the project, coloring the crayon with thick layers. I usually try to demo what happens if thick layers aren't applied so they fully understand Mrs. Pruitt is not trying to torture them!

Once they have been checked, they are asked to crunch up their paper. Some kids love this part and others hate it. Especially when you have been coloring on it for days. But, usually the ones who don't want to do this step come around once they see the final step from their peers.

After the crumbling is done ( and hopefully they don't over do it, too much crumbling and the paper won't hold up to the liquid), and it is time for the black paint.

For this part, I set them up on a tray, with a sponge brush, tissues and a smock.

 They drop only a few drops of the slightly watered down paint, spread it out with the sponge brush and wipe away with the tissue. I have them do this 4 times, once in each corner of the paper. 

If they try to do the whole paper at the same time, the project comes out being very dark. Sometimes this can be fixed by spraying lightly with water and rewiping, but not always.
http://pinterest.com/pruitts/elementary-art-education/