Friday, March 18, 2016

Hundertwasser's Blobs Grow in Beloved Gardens

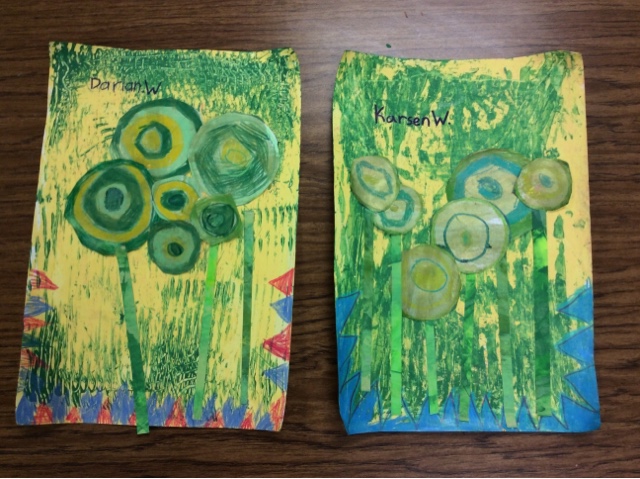
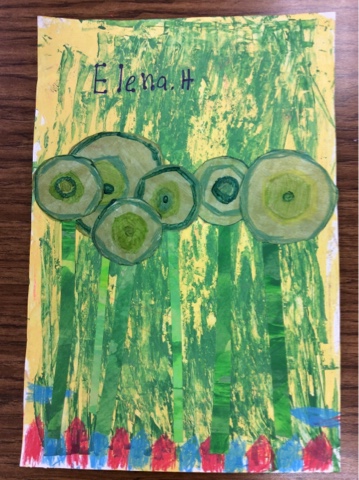
Blobs Grow in Beloved Garden. What is the Blob? Why is he there? We aren't sure, but we love the garden! 

I worked with one of my second grade classes to MOSTly recreate this Hundertwasser art piece. The kids loved the concentric shapes and the red and blue fence. 

Since we weren't adding the blob, we wanted to add texture into the piece. So we painted the background and used some paint scrapers to add in that texture we wanted.
We attempted colored pencils to add the layers of concentric circles, but later moved to sharpie colors instead.
The kids loved looking at Hundertwasser's work, the colors and textures and mysterious faces that appear in his work. They also were pretty envious of the people in Germany who get to eat in the most interesting McDonalds that Hunderwasser designed himself.


Wednesday, March 9, 2016

Art Show 2016

Yeah, another art show in the books! What a great night of celebrating our young budding artist.
We had a fabulous turnout and despite the threat of bad weather, we had a record breaking number of families show up.
Even though I sometimes grumble over the fact that it is a process that takes several months to pick out artwork, contact parents for permission, label, prepare letters to congratulate and finally several hours to hang, for one evening. 
I know that so many schools and so many kids don't get this opportunity, not even one night a year to celebrate their art...because art isn't valued every where. 
It is good to count your blessings. I hope you all have success in celebrating youth art in your communities!

Monday, February 15, 2016

Jasper Johns Inspired Alphabet with Kinder

I am wrapping up this kinder lesson inspired by Jasper Johns.  Watercolor resist is always a hit with kinder and with this lesson, we got the added benefit of practicing our letters.  
It was great hearing them sing the alphabet to remember what was next.  While a good amount have their alphabet down, some really needed the practice.  It  is one thing to sing the alphabet but remembering the order as they were writing was another.
This was also a great project to practice filling space, over and over and over again.
When we are doing projects like these, I want their crayon to have a nice thick coat.  So, we talk about using our art muscles.  I often go around the art room to see who has the biggest muscles (crayon pressed really hard).  Talk about a good motivator, especially those competitive boys.
I love how some naturally wanted to paint their boxes in with a different color, they probably felt like that is what they were supposed to do.  While others experimented a bit more.  Some students started off painting in the rectangles and abandoned that thought once they saw that they were allowed to just paint as they pleased.
This was one of my favorite lessons for kinder so far this year.

Thursday, February 4, 2016

Mirroring 360

If you have an Ipad in your classroom, this is will change your life!  Last year our district issued each teacher an Ipad and at the beginning of this year, we were given a dongle. 
                       
 But, every time I wanted to use it, I had to get behind my computer, it was awkward and of course my back is turned while I'm trying to set up.  Not that it takes THAT long, but still, sometimes it doesn't take that long for mischief to happen.  And if you've been teaching long at all, you know to cut down those opportunities as much as possible.


 Later this fall, we started using mirror 360.  I don't have to remove plugs, I don't have to turn my back to the class. I walk up to my computer and select a few things and can immediately start to project on the screen.
          
Even better, is I can walk around the room, I'm not "stuck" anywhere.  If I've got a group of students that need proximity, no problem.  I can go stand by them and present my lesson at the same time.
          
It is such a great tool, it has encouraged me to use more technology in my classroom the last few months.  You may have to check with your technology department, it is possible they will need to install the mirror assist onto your home computer, but other than that it is a piece of cake!
          
It has really come in handy now that I have my class set of IPADS.  I can show them the apps that they can use.  I can demonstrate the tools on the apps, which saves so much time.  
Demonstrating using 123Sculpt. 123Sculpt. 
         

Demonstrating using the MoMA App.
                  

Here you can see, that what I pull up on my IPAD projects on the computer, which projects to the screen!  Isn't this technology lovely!  Sure, keep the dongle...you might need it in case of an emergency, or maybe you don't want to make your life just a little easier!  But trust me, you are going to love Mirroring360

Tuesday, January 26, 2016

Hearts and Stars


This year I decided to do my stars and hearts. But, after doing them for a couple of years, I was ready for a change.

This is a very shuttle change, and my first graders are still getting what I want out of this lesson, which is practicing line. I did choose to leave out the stamping part, but that would be easy to do in the background, maybe next year.  Below are some images from that lesson from a previous post.  


This lesson was featured here, on Deep Space Sparkle.
I do this often with my projects, making some simple changes can breathe new life into the project.  I can't just get out the same old projects year after year and blow the dust off.  This gets redundant and then we start to lose passion for what we do.  Plus, isn't that what we do, teach kids to try new things?  

If we aren't willing to experiment, why would they?  Plus, you can always go back to the way you originally did a project.


Saturday, January 2, 2016

Happy New Year 2016

It has been a busy season. My oldest has been taking ballet for 8 years now, she is almost officially a teen. She has always been cast in some of the smaller roles in her dance companies production of the Nutcracker.
This year she was cast in 6 roles, and several proved to be very challenging. They have been rehearsing since late August, each Saturday, all day and some Friday night rehearsals. This on top of her regular ballet classes, 6 hours during the week. 
Little sis joined this year and made her debut as an angel and party girl. 
I saw her push herself, and I saw a range of emotions over the last few months. Of course the hardest to see were those tear filled afternoons where she was physically exhausted and felt she was letting others down. 


In the end, it came together, she and the other dancers did an amazing job (Yes, Mom cried). I saw them encourage one another, and swell with pride on a job well done, then collapse on the couch in shear exhaustion.

It is so great to see these young ladies, develop their artistic talents.  AND...interesting to see my own children explore their forms of art, my oldest in ballet, my middle is a tinkerer (the recycle bin is her favorite place to find treasures), and already my youngest is happiest when she has a notebook and colors!
It is shameful that the arts are not valued more in our schools.  Even my own high school alma mater has taken away their art program.  But of course, you should see the football field, brand new second gym, and new training facility.  Ugh...another conversation for another day.  
Hope you all have had a well deserved break!  Happy New Year to all.

Wednesday, December 9, 2015

How to Make Light Saber Rubbings

As the anticipation grows for the new Star Wars movie, The Force Awakens, this is a perfect time to do these light saber rubbings.  Here are the steps for doing the rubbings with your kids or students.
Rubbings are a great way to introduce texture, and how we perceive how an object feels. It is also a great way to get your students to use descriptive words.  Here are the steps:
                                                                You will want large paper, I used 18" by 24" black construction paper.

I cut the paper into 6" by 24" inch strips.
The light sabers will need to be done ahead of time. I cut the light sabers from heavy grey paper, and traced the details with glue. I made a set of these for each of my table groups (each table has between 3-5 students). 
We rubbed the first light saber with red art sticks, or prismacolor sticks, you want color that will show up on the dark paper.
Then, rub your blue light saber.
The next step is to add white to the light saber, just the "blade" part of the saber. This will make it look like it is glowing. (I also added a small amount of yellow)
Once this is done, the next person can start the process. And the person finishing the rubbing can add details to the handle.

 
Now, this doesn't need to be the last step, but students can add a border of color. This is a great thing for kids to do while they are waiting their turn to do the rubbings or when they are finished with the rubbing! Have fun with this, your kids will.
http://pinterest.com/pruitts/elementary-art-education/