Tuesday, February 26, 2013

El Dia De Los Muertos

I love the celebration of the day of the dead.  While it sounds very morbid, it is a very beautiful celebration of life.  This is actually a day that is recognized by the church and you might know it as All Saints Day.  Some people shy away from doing this cultural piece because of it's link to the church, but it is also a deeply rooted in Latino culture.  I often tell my kids, if you celebrate Halloween, you are celebrating something much scarier than el dia de los muertos.  This day is an occasion of celebrating the life of the people you have loved the most.  The alters are filled with pictures of those loved ones, as well as their favorite foods and drinks.  Marigolds and candles adorn these alters along with other items that might have been important to that person.   

Metal calavera with sharpie, 5th grade.

Kinder and first grade calavera.  We bravely used sharpie and construction paper crayons, and you can see not all art teachers hate glitter!

A must have book for doing milagros.

Paper bag calaveras, 2nd and 3rd grade.

Shrink art milagros and nichos from metal tooling scraps, 4th and 5th grade.
Styrafoam print of nichos with shrink art milagros, 4th and 5th grade.

Scratch art milagro and watercolor nichos, 4th and 5th grade.
Paper bag ofrendas, done with 2nd and 3rd grade.

Balsa foam skulls, this was done with 5th grade.

Collage offrendas, typically I do these with 2nd and 3rd graders.


Friday, February 15, 2013

Original Works Fundraiser 

This is going to be my 11th year to do a fundraiser for my school.  All but one year has been with Original Works.  I tried another company and was not pleased.  Parents expressed they liked Original Works better as well.  Two of the lessons I have kept the same all of these years, ocean life and rainforest animals.  Everything else I have changed a time or two.  In fact, until this year I have kept the kinder lesson.  I decided that I would have all grade levels do various habitats.  So 5th grade did Safari sihouettes, 4th rainforest animals, 3rd ocean life, 2nd magnified bugs, 1st my home, and kinder did the baby birds. The money raised helps me buy clay and glazes, special items like metal tooling supplies, scratch art, and shrink art.  Plus, I've been able to build my own library!   Do you do a fundraiser? If so, what type of fundraiser and what do you buy with the money?


Marvilous Mondrian!


Fun with Mondrian.  This past September we studied Mondrian as one of our line study lessons and of course primary colors.  Fourth and 5th graders started with a 7 by 5 piece of cardboard. They glued strips of cardboard in vertical and horizontal lines.  I sprayed glue on them and covered them with heavy aluminum foil.  Day two, the kids used black sharpie on all the raised lines and filled in the spaces with primary colors, leaving only a few silver spaces. Second and third grade made a crazy line Mondrian.  They drew out 8-10 lines and then went back to each line and created a parellel line next to it.  Those lines stayed black and all the spaces in between were filled with the primary colors.
Kinder and 1st grade did Mondrian animals, here are the animals we morphed into Mondrian animals; owl, sea horse, jelly fish, turtle, fish, duck, pig, and flamingo...aren't they cute!! 


I love the flamingo with the hair!!


Thursday, February 14, 2013

Cave Art

Cave Art


I did this unit several years ago. We went to the official website of the Cave of Lascaux. You can navigate through the cave and check out the cave art together, so cool!  Here is the website if you are interested;  http://www.lascaux.culture.fr/?lng=en#/fr/02_00.xml.

 Kinder and 1st grade did the painted hand prints you see above.  They used chalk pastel to add symbols, lines and embellishments.  They were required to pair colors to make them stand out.

 The lesson above was done with 2nd and 3rd grade.  I used the Rolyco cave art kit, at the time it was sponges, they are now stencils.  I haven't used those yet, so curious to see if they will be as easy to use as the stamps...we will see.  For this, we used a heavy grade paper I got from Lowe's, it was very thick and tore nicely.  That was the first step, tear edges of the paper and we used a watered down black or gray to paint the edges, just to give it that old feel.  Then students stamped with various colors, red, purple white, black, and brown with the cave art stamps.  Day two they added chalk pastel detailing.

This was a scratch art that I did with my 4th and 5th graders.  It is actually a tar paper also found at Lowe's or Home Depot, from the roofing department.  I believe one roll was enough for all 200 plus kids.  I love this project, but plan for significant prep time and cross your fingers for good weather.  You will need 8-10 cans of spray paint to get good coverage.  Do yourself a favor, get the spray paint with the wide button.  The first time I did this project I did not, and I had blisters on just about every finger tip (ouch!!).  This may sound a bit scary, but students actually scratch with nails, BIG NAILS!  I have done this lesson several times, not with just cave art, over the years.  You just have to make if very clear of your expectations, one wrong move and they don't get to continue.  Instead they get plain white paper and a pencil.  Not once did I have to do more than just make that threat.  They don't want to be "the one" who misses out on getting to use a nail to make their masterpiece!!

Sunday, February 10, 2013

Ancient Egypt


I was inspired a few years ago to do an Ancient Egyptian Unit after my husband and I went to visit family in Colorado.  Grandparents took our two children, at the time, while my husband and I got to hang out for a night in Denver.  We decided to spend part of our time at the Denver Art Museum, which happened to have an exhibit of King Tut and other great pharaohs.  I left inspired and full of ideas!  I can't wait to do this unit again.  I have ideas to change a few things up, but was very happy with the products the kids made.  While everyone seemed to enjoy this unit, I noticed the boys in particular extremely enthused.  

I do not have a picture of the second grade piece, which was an amulet design done in clay.  Hopefully I can find examples of those soon.


Some great resource books for Egyptian Art.

Make your own cartouche on the web.  Then have the kids cut out cartouche for a printmaking project done on foam board.  This was a project I did with my 1st graders.

Kindergarten made the Egyptian gold collars.

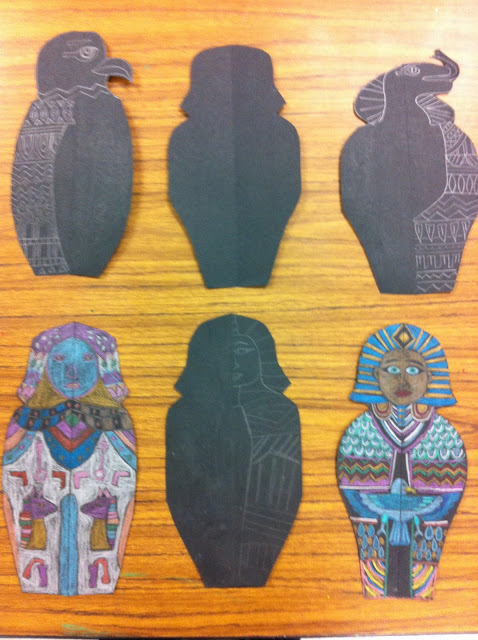
Sarcophagus design by my 5th graders.

My example of the Egyptian collars.


More student examples of the Egyptian cartouche.
Hieroglyphs done with metallic crayon.
Some 5th graders who finished there work early got to make an Egyptian amulet in gold scratch art paper.  They added detail with acrylic paints.
Fourth graders made their designs incorporating a variety of things, including; deities, hieroglyphs, amulets, and patterns. They then used colored pencil and sharpie for color.  These were wrapped around pringles cans to complete the canopic jars.

Third graders made designs of Egyptian deities in gold metal art foil.  Then used sharpies to add color.

Saturday, February 9, 2013

Literacy and Art


I love reading great books to tie into a lesson.  Chinese New Year is a great opportunity to do just that.  Although I have taken a break from Chinese New Year for the past two years, it is absolutely one of my favorite lessons to do the my students.  Below is my personal classroom library collection of CNY and Asian culture books.  

These three books are really cute, especially Suki's Kimono.


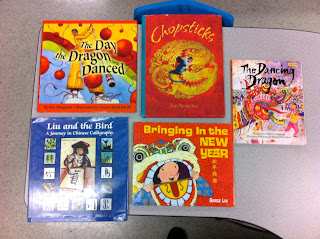
These five books are great books to have in our classroom, with Chopsticks and The Dancing Dragon being my favorite two!
This book, The Boy Who Painted Dragons, is my absolute favorite!  It is a great story, and the illustrations are beautiful.  
http://pinterest.com/pruitts/elementary-art-education/